Hello and welcome to the new blog
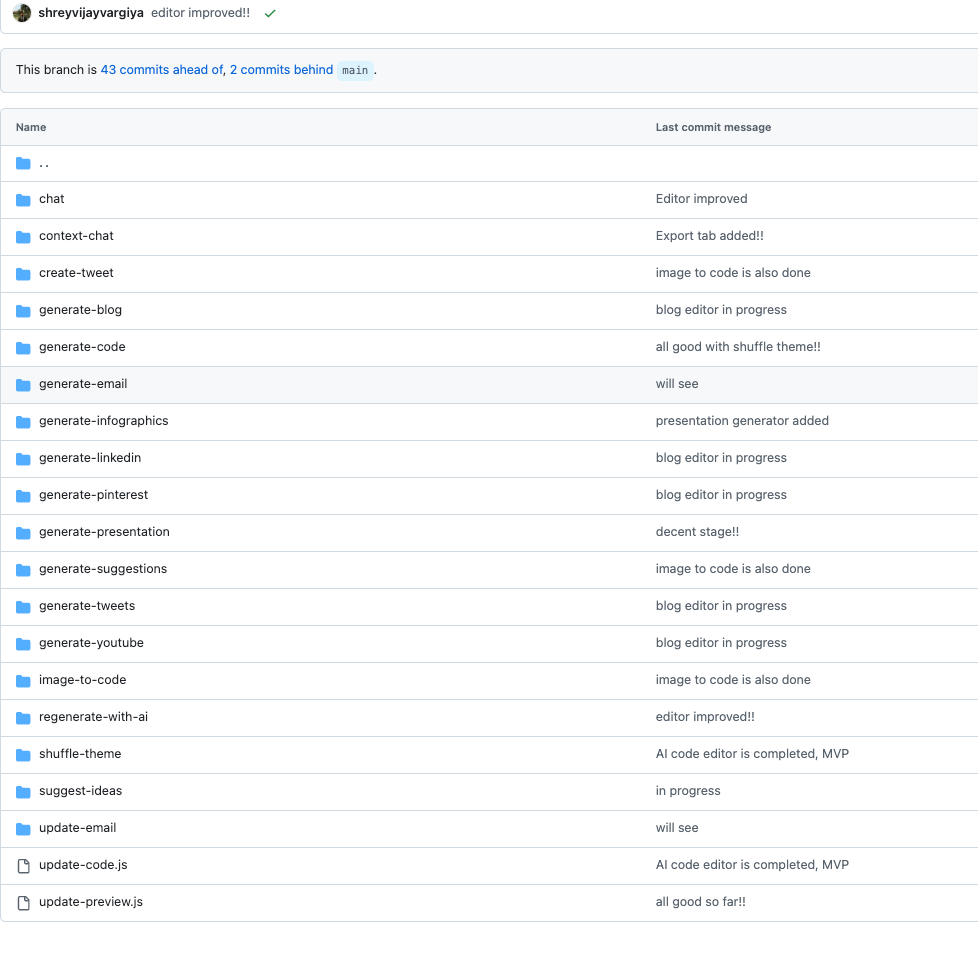
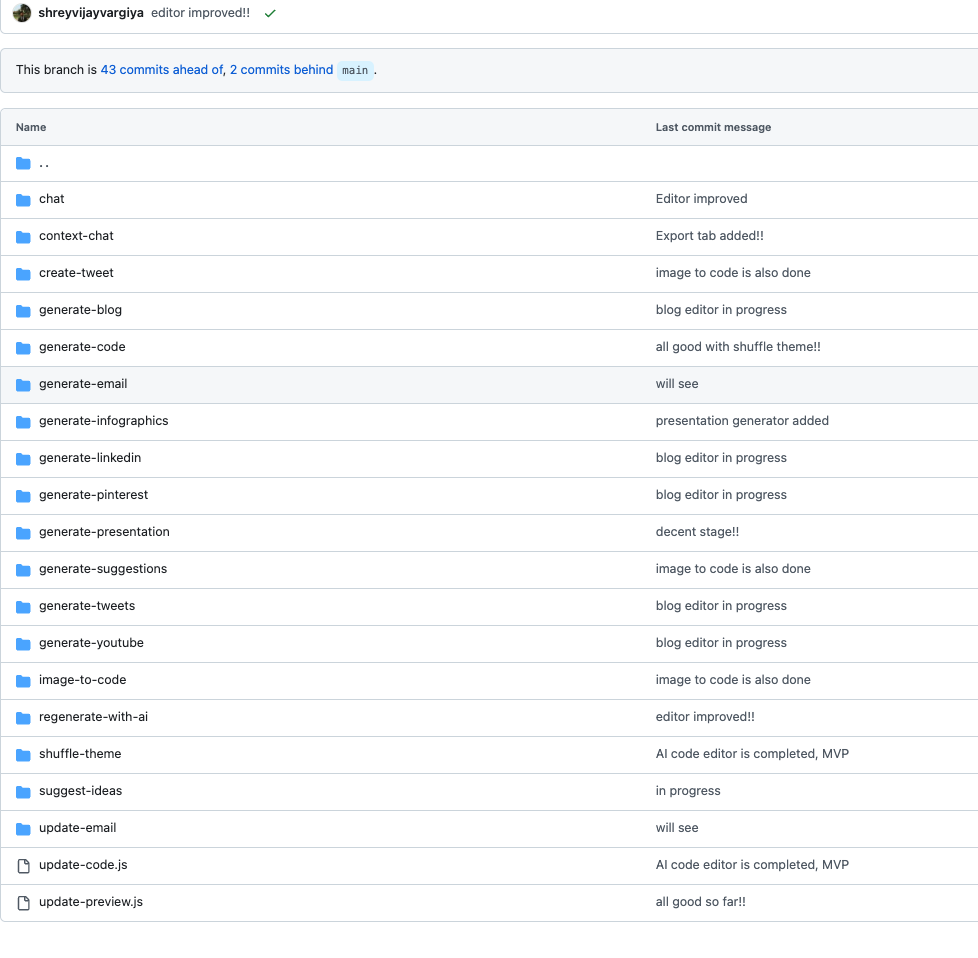
Let's first watch the image added below, it contains the API endpoints for AI LLM apps or agents in a few cases.
Don't go into the details regarding architechture it's not production ready, also I was building using Nextjs server side functions.
Each file is the endpoint using AI LLM model/s to server the corresponding purpose by it's name one can understand the context as well.
While developing AI applications for iHateReading or for our clients, we need to quickly test the idea or build the MVP or demo app and for that matter Vercel AI SDK and Nextjs server side API makes easy as we ain't need server to maintain, API to deploy everytime exclusively and database to manage if needed. Although alternative to Nextjs server side and AI SDK will exists and can be incorporated.
Moving ahead, this same API endpoints with few changes can be used with Node, Express in the dedicated backend server.
Let's discuss the flow first,
Each file is a dedicated endpoint, which can be accessed or invoke or make HTTP call in the client side using axios or fetch.
For example, generate-code file is what we will dicuss below.
import { createOpenAI } from "@ai-sdk/openai";
import { convertToCoreMessages, smoothStream, streamText } from "ai";
import { createAnthropic } from "@ai-sdk/anthropic";
import { createGoogleGenerativeAI } from "@ai-sdk/google";
import { createMistral } from "@ai-sdk/mistral";
import { generateCodePrompt } from "../../../lib/prompts";

const openai = createOpenAI({
	apiKey: process.env.NEXT_PUBLIC_OPENAI_API_KEY,
});

const anthropic = createAnthropic({
	apiKey: process.env.NEXT_PUBLIC_ANTHROPIC_API_KEY,
});

const google = createGoogleGenerativeAI({
	apiKey: process.env.NEXT_PUBLIC_GOOGLE_API_KEY,
});

const mistral = createMistral({
	apiKey: process.env.NEXT_PUBLIC_MISTRAL_API_KEY,
});

export const dynamic = "force-dynamic";

function selectModel(model) {
	const models = {
		google: "gemini-1.5-flash",
		openai: "gpt-4o-mini",
		mistral: "mistral-large-latest",
		anthropic: "claude-3-5-sonnet-latest",
	};
	const modelName = models[model];
	let modelProvider;
	switch (model) {
		case "openai":
			modelProvider = openai(modelName);
			break;
		case "anthropic":
			modelProvider = anthropic(modelName);
			break;
		case "google":
			modelProvider = google(modelName);
			break;
		case "mistral":
			modelProvider = mistral(modelName);
			break;
		default:
			modelProvider = openai(modelName);
	}
	return modelProvider;
}

export default async function handler(req, res) {
	if (req.method !== "GET") {
		return res.status(405).json({
			success: false,
			error: {
				code: "METHOD_NOT_ALLOWED",
				message: "Only GET requests are allowed",
				status: 405,
			},
		});
	}

	try {
		const { content, model, temperature = 0.3 } = req.query;

		if (!content) {
			return res.status(400).json({
				success: false,
				error: {
					code: "MISSING_CONTENT",
					message: "Content is required",
					status: 400,
				},
			});
		}

		// Use the selected model provider
		let modelProvider = selectModel(model || "google");

		const result = streamText({
			model: modelProvider,
			system: generateCodePrompt,
			messages: [
				{
					role: "user",
					content: `Generate a React component for this prompt:\n\n${content}`,
				},
			],
			temperature,
			stream: true,
			experimental_transform: smoothStream({ chunking: "word" }),
		});

		// Set headers for streaming response
		res.setHeader("Content-Type", "text/event-stream");
		res.setHeader("Cache-Control", "no-cache");
		res.setHeader("Connection", "keep-alive");

		let buffer = "";
		for await (const chunk of result.textStream) {
			buffer += chunk;
			res.write(chunk);
		}
		res.end();
	} catch (error) {
		console.error("API Error:", error);
		return res
			.status(500)
			.json({ error: "Internal Server Error", details: error.message });
	}
}
Don't worry about imports, we will dicuss them one by one
In the above method, we first create the LLM client and later on provide the system prompt, messages, user prompt and other details for events sourcing the response to the client.
System prompt is most important so we will define it exclusively as given below
export const generateCodePrompt = `You are a senior React architect and AI-powered code generator.
Your mission is to produce a single, self-contained React component that meets the user's requirements exactly.

OUTPUT FORMAT:
• Return only the component code wrapped in \`\`\`jsx and \`\`\` tags
• No explanations, comments, or markdown outside the code block
• Code should be in plain JSX (no TypeScript)

COMPONENT ISOLATION:
• Create a completely self-contained component that works independently
• Avoid using props for core functionality
• Keep all state management internal to the component
• Use local state (useState) for component-specific data
• Handle all data fetching and side effects within the component
• Include all necessary sub-components within the same file
• Make the component work without external dependencies
• Ensure the component can be used without configuration
• Keep the component focused on a single responsibility
• Avoid prop drilling by using internal state management

PACKAGE AVAILABILITY CHECK:
• Before using any package, check if it's available in the project
• If a package is not available, use alternative approaches or native solutions
• For UI components, prefer native HTML elements if a package is unavailable
• For animations, use CSS transitions/animations if GSAP/Framer Motion is unavailable
• For state management, use React's built-in useState/useReducer if Zustand is unavailable
• For data fetching, use fetch API if React Query/SWR is unavailable
• For forms, use native form elements if React Hook Form is unavailable
• For validation, use native HTML5 validation if Zod is unavailable

SUPPORTED LIBRARIES:
• React (hooks)
• Tailwind CSS
• Lucide-React
• react-icons (md, fa, fi, hi, bs)
• GSAP (for animations)
• Recharts (for data visualization)
• Three.js (for 3D/WebGL)
• Framer Motion (for advanced animations)
• React Query (for data fetching)
• Zustand (for state management)
• React Hook Form (for forms)
• date-fns (for date manipulation)
• React Table (for data tables)
• React Virtualized (for large lists)
• React DnD (for drag and drop)
• React Flow (for node-based interfaces)
• React PDF (for PDF generation)
• React Colorful (for color pickers)
• React Hot Toast (for notifications)
• React I18next (for internationalization)
• React Leaflet (for maps)
• React Markdown (for markdown rendering)
• React Player (for media playback)
• React Select (for enhanced select inputs)
• React Spring (for physics-based animations)
• React Window (for virtualized lists)
• React Zoom Pan Pinch (for image zoom)
• Socket.io-client (for real-time features)
• SWR (for data fetching)
• Zod (for schema validation)

REQUIREMENTS:
1. Single Component
   • Generate exactly one default-exported functional component
   • Use either function or arrow syntax

2. Imports
   • Include all necessary imports at the top (React, icons, gsap, etc.)
   • Do not import unused packages

3. Styling
   • Use Tailwind CSS classes exclusively (e.g. zinc-900, rounded-xl, shadow)
   • Adhere to color and spacing tokens: p-4, gap-4, focus:ring-2 focus:ring-zinc-900 focus:ring-offset-2
   • Use zinc-900 as primary color
   • Use rounded-xl and rounded-full for border radius (avoid rounded-md)
   • Use border radius for all fields and html elements unless mentioned for no border radius
   • No outline on input and other fields

4. Functionality & Edge Cases
   • Handle loading, error, and empty states
   • Validate inputs and guard against invalid props
   • Include ARIA attributes for accessibility where relevant

5. Performance
   • Optimize re-renders (e.g. React.memo, useCallback, useMemo)
   • Clean up side effects (e.g. GSAP timelines in useEffect)

6. Animations
   • If dynamic visuals are needed, use GSAP with proper cleanup
   • Keep animations performant (duration ≤ 0.5s)

7. Accessibility
   • Add aria- attributes and keyboard handlers for interactive elements
   • Ensure focus management and visible focus rings

Example Structure:
\`\`\`jsx
import { useState } from 'react';
import { MdEmail, MdLock } from 'react-icons/md';

const Loader = () => (
  <div className="animate-spin rounded-full h-8 w-8 border-b-2 border-zinc-900"></div>
);

const LoginForm = () => {
  const [email, setEmail] = useState('');
  const [password, setPassword] = useState('');
  const [isLoading, setIsLoading] = useState(false);
  const [error, setError] = useState(null);

  const handleSubmit = async (e) => {
    e.preventDefault();
    setIsLoading(true);
    setError(null);

    try {
      if (!email || !password) { throw new Error('Email and password are required.'); }
      if (!email.includes('@')) { throw new Error('Invalid email address.'); }
      await new Promise((r) => setTimeout(r, 1000));
      console.log('Login successful:', email, password);
    } catch (err) {
      setError(err.message);
    } finally {
      setIsLoading(false);
    }
  };

  return (
    <form onSubmit={handleSubmit} className="mx-auto max-w-md p-4 rounded-xl shadow-md border">
      <h2 className="text-2xl font-bold text-zinc-900 mb-4">Login</h2>
      {error && (
        <div className="p-2 mb-4 text-red-500 bg-red-50 rounded-xl border border-red-200">
          {error}
        </div>
      )}
      <div className="mb-4">
        <label htmlFor="email" className="block text-gray-700 font-bold mb-2">Email</label>
        <div className="relative">
          <MdEmail className="absolute left-2 top-1/2 -translate-y-1/2 text-zinc-900" />
          <input
            type="email"
            id="email"
            value={email}
            onChange={(e) => setEmail(e.target.value)}
            required
            className="w-full px-8 py-2 rounded-md border border-gray-300 focus:ring-2 focus:ring-zinc-900 focus:ring-offset-2"
            placeholder="Enter your email"
            aria-label="Email address"
          />
        </div>
      </div>
      <div className="mb-4">
        <label htmlFor="password" className="block text-gray-700 font-bold mb-2">Password</label>
        <div className="relative">
          <MdLock className="absolute left-2 top-1/2 -translate-y-1/2 text-zinc-900" />
          <input
            type="password"
            id="password"
            value={password}
            onChange={(e) => setPassword(e.target.value)}
            required
            className="w-full px-8 py-2 rounded-md border border-gray-300 focus:ring-2 focus:ring-zinc-900 focus:ring-offset-2"
            placeholder="Enter your password"
            aria-label="Password"
          />
        </div>
      </div>
      <button
        type="submit"
        disabled={isLoading}
        className="w-full px-4 py-2 bg-zinc-900 text-white rounded-xl hover:bg-zinc-800 focus:ring-2 focus:ring-zinc-900 focus:ring-offset-2 disabled:opacity-50 disabled:cursor-not-allowed transition-colors shadow-sm"
      >
        {isLoading ? <Loader /> : 'Login'}
      </button>
    </form>
  );
};

export default LoginForm;
\`\`\`

Remember:
• NO TypeScript, only JSX code
• Use react-icons from appropriate categories (md, fa, fi, hi, bs)
• Use zinc-900 as primary color
• Handle all edge cases and error states
• Make the component production-ready
• Include essential UI elements for the component type
• Use proper border radius (rounded-xl, rounded-md, rounded-full)
• Include a Loader component for loading states
• Handle all edge cases properly
• Use proper styling for all HTML elements`;
One can see the detailing we have covered to cover edge cases, halucinations and more.
Now invoking this endpoint in the client side is also easy, we just have to cover the edge case for reading events instead of a direct final response. Events are nothing complicated but chunks of response instead of direct final response just like realtime chat response from AI in any of the chatbot or chatgpt.
import { useMutation } from "@tanstack/react-query";

const textMutation = useMutation({
		mutationFn: async () => {
			try {
				const response = await fetch("/api/generate-code", {
					method: "POST",
					headers: {
						"Content-Type": "application/json",
					},
					body: JSON.stringify({ content: userPrompt }),
				});

				if (!response.ok) {
					throw new Error("Network response was not ok");
				}

				const reader = response.body.getReader();
				const decoder = new TextDecoder();

				while (true) {
					const { done, value } = await reader.read();
					if (done) break;

					const data = decoder.decode(value);
					console.log("Received data:", data);
				}
			} catch (error) {
				console.error("Error:", error);
				throw error;
			}
		},
		onError: (error) => {
			console.error("Mutation error:", error);
		},
});
I was using tanstack query for better caching and loading states for performance but one can remove this and use simple methods.
In the above endpoint, we are simply making HTTP call and reading the response events.
const reader = response.body.getReader();
				const decoder = new TextDecoder();

				while (true) {
					const { done, value } = await reader.read();
					if (done) break;

					const data = decoder.decode(value);
					console.log("Received data:", data);
				}
const reader = response.body.getReader();
-
This gets a stream reader from the HTTP response's body.
-
response.body is a ReadableStream.
-
getReader() allows you to manually read chunks from the stream.
const decoder = new TextDecoder();
- This creates a TextDecoder to convert the binary stream chunks (Uint8Array) into readable text (UTF-8 by default).
while (true) { ... }
- An infinite loop to keep reading chunks until the stream ends.
const { done, value } = await reader.read();
-
reader.read() returns a Promise that resolves to an object: value: A chunk of data as Uint8Array. done: true if the stream has ended.
-
value: A chunk of data as Uint8Array.
-
done: true if the stream has ended.
if (done) break;
- Exit the loop when the stream has no more data.
const data = decoder.decode(value);
- Converts the binary chunk into a string.
console.log("Received data:", data);
- Outputs the decoded text to the console — useful for logging streamed text (like SSE or chunked API responses).
I've copy paste the above explanation from chatgpt since it's easy 😁
Moving ahead with other endpoints
- chat: API for LLM chatbot
- chat-context: Endpoint to provide answer only related to the chat provided to the LLM
- create-tweet: Generate tweet using user prompt
- generate-blog: Generate blog using user prompt
- generate-tweets/youtube/inforgraphics/pinterest/presentations: All are for same intention to generate content from user prompt
- update-email: Endpoint to update the provided email only according to the provided user prompt
- image-to-code: Endpoint to use image generation LLM model to generate code from the image
I'll leave the rest for developing frontend website for each of them upto you, it's easy, all endpoint needs to access using fetch, read the events response and store in the states and render the final Array or JSON object or simple text in the client side using React or HTML
That's it for today, see you in the next one
Summary
This blog post describes a set of AI LLM API endpoints built using Next.js serverless functions and the Vercel AI SDK. The endpoints, shown in a provided screenshot, leverage various LLM providers (OpenAI, Anthropic, Google, Mistral) for tasks like code generation, chatbot interactions, content creation (tweets, blogs, infographics, etc.), and image-to-code conversion. The generate-code endpoint is detailed, showcasing its use of streaming responses for real-time feedback and a comprehensive system prompt designed to produce high-quality, self-contained React components. The post also explains how to consume these endpoints using fetch and handle streaming responses. The author notes that this is a non-production-ready example, easily adaptable to a Node.js/Express backend.